This section assumes that AD FS is already installed on your computer.
To configure the AD FS with SAML 2.0 protocol:
1. Install and configure an AD FS server. You must install and configure a server that runs AD FS.
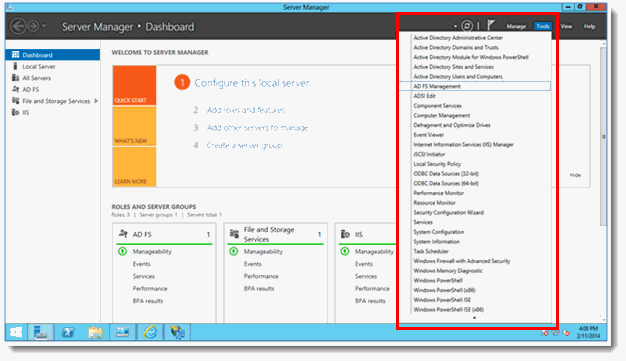
2. From the Server Manager dashboard, launch the AD FS Microsoft Management Console (MMC) by selecting Tools > AD FS Management.
3. In the right pane, click the Add Relying Party Trust link.
4. On the Welcome page, select the Claims aware radio button, and then click the Start button.
5. On the Select Data Source page, click the Enter data about the relying party manually radio button, and then click the Next button.
6. On the Specify Display Name page, type a name in the Display name field. In the Notes field, type a description for this relying party trust. Then click the Next button.
7. On the Configure Certificate page, if you have an optional token encryption certificate, click the Browse button to locate a certificate file, and then click the Next button.
8. On the Configure URL page, do the following, click the Next button, and then go to Step 9:
· Select the Enable support for the SAML 2.0 WebSSO protocol check box.
· In the Relying party SAML 2.0 SSO service URL field, type the Security Assertion Markup Language (SAML) service endpoint URL for this relying party trust (it should be https://{TrialMaster or AnjuEDC_url}/account/saml and support https protocol – change {TrialMaster or AnjuEDC_url} to real host url ), and then click the Next button.
9. On the Configure Identifiers page, specify the identifier.
 Note:
This identifier must be shared with the TrialMaster or AnjuEDC side, along
with the SSL listed in below step. Click the Add button
to add them to the list, and then click the Next button.
10. On the Choose Access Control Policy page, select a policy to provide detailed information about the access control policy. Then click the Next button.
11. On the Ready to Add Trust page, review the settings, and then click the Next button to save your relying party trust information.
12. On the Finish page, click Close. Then click the Add Rule button in the Edit Claim Rules dialog.
13. In Claim Rule Wizard, select Send LDAP Attributes as Claims claim rule template from the drop-down and click the Next button.
14. On the Configure Rule page, enter the Claim rule name, select Active Directory (AD) as the attribute store. In the LDAP Attribute column, select User-Principal-Name or any other AD attribute, which stores user email. Then select UPN as the outgoing claim type and click the Finish button.
15. Click on the Certificates folder in the left pane and export SDFS Signing. To export the Signing certificate, right-click on it and select View > Details > Copy to File.
 Note: This certificate must be sent to
TrialMaster or AnjuEDC side.
16. Send to TrialMaster “sso.yourdomain.com/adfs/ls/” (this is the URL on your ADFS server).
17. Send the Signing certificate to TrialMaster or AnjuEDC.
18. Send the Identifier name. In this document it is named “TrialMaster5” as an example.